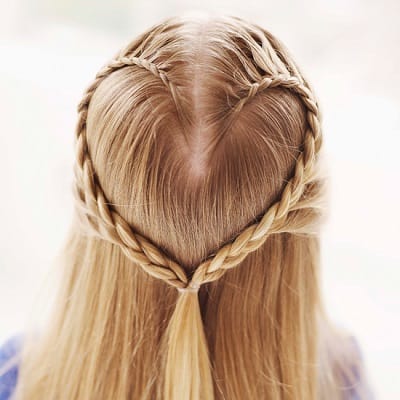
Some people wear their heart on their sleeve, but I always recommend wearing your heart on your head! With Valentine’s Day approaching, I have the perfect way to do just that. By far the most popular style in my bestselling book, The Heart Braid has been posted and reposted hundreds, if not thousands, of times all over the web on blogs, mom sites like Pop Sugar, BlogHer and Parents.com, Pinterest and Facebook. Heart braids look absolutely outstanding on your little sweetheart, and is a great way to show some love.
No need to be intimidated, this braid is actually much easier than it looks. I’ll walk you through step-by-step with a heart braid tutorial from my book, Cozy’s Complete Guide to Girls’ Hair.
My advice? Try it a few times before Valentine’s Day to get the hang of it. And if you’re located in the NYC area, stop into Cozy’s Braid Bar at one of my salons and we’ll do it for you!
Now, before you start, I recommend working a small amount of Behave Styling Cream into damp hair. This product will help hair hold the heart shape all day and keep frizzies and flyaways from interfering with your masterpiece. (Plus, it smells amazing!)
Ready, set, braid!
Step 1 - Start with damp hair
Start with damp hair (either towel-dried or misted). use a wise-tooth comb to detangle hair. Then, using a fine-tooth comb, part the hair down the middle of the head. Clip one side upright above the ear.
Step 2 - Start with one side of the part
On one side of the part, use the fine-tooth comb to gather a thin section of hair from the crown. This section should measure about 2 inches from the hairline to the top of the head.
Step 3 - Divide the section into three
Divide this section into three, and begin a French Braid starting at the crown and curing toward the temple, then toward the back of the head, like the top lobe of a heart. You will be lifting hair into the braid only from this side of the part. Leave no loose hair in front of the ear.
Step 4 - Secure the braid with a ponytail holder
When you reach the center part at the back of the head, secure the braid with a ponytail holder. If the hair is very long, end the braid about mid-ear; the ends will hang down the back.
Step 5 - Unclip hair on the other side
Unclip the hair on the other side of the part and repeat the process. Secure with a ponytail holder.
Step 6 - Join the two ends of the braid together
Paragraph section: Join the two ends of the braids together in the back with a ponytail holder to form the bottom point of the heart.
See? It’s really that simple!
The Heart Braid is also a picture-perfect plait for other special occasions such as a wedding (so pretty for a flower girl) or even as a fun alternative to everyday hairstyles. And there’s no reason limit the heart braid hairstyle to only little girls. Big girls love it, too!
xox,
Cozy
Pick up your own copy of Cozy’s Complete Guide to Girls’ Hair containing instructions for all kinds of braids and other girls’ hairstyles, blow drying instructions and tips about products.
The post The Famous Heart Braid, Step-by-Step appeared first on SoCozy.


